
Want to design directly in Figma using AI prompts? Claude now integrates with Figma, letting you generate design elements—like hero sections, headings, and buttons—simply by describing what you want. Here’s how to connect the two platstforms and start creating.
What You’ll Need
This works with the free plans of both Figma and Claude—no paid subscription required.
Step 1: Connect Figma to Claude
- Open a new chat in Claude.
- Click the plus (+) icon.
- Select Connectors (not Plugins—easy to mix these up).
- Search for Figma, or select it if it’s already listed.
- Click Connect to Claude.
- Scroll down through the permissions request and click Agree to grant Claude access to your Figma account.
Once connected, you’ll see a “Connected to Figma” confirmation, and the toggle will be checked.
Get 20% discount on website hosting plan.
Step 2: Enable Figma in Your Chat
Every time you start a new chat, make sure the Figma toggle is switched on under Connectors. This activates Figma for that session.
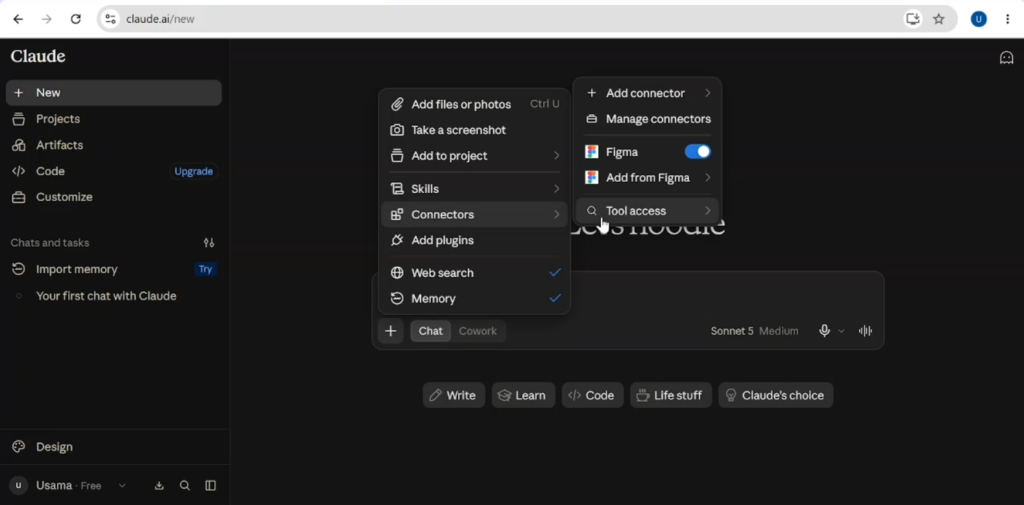
Step 3: Prompt Claude to Create a Design
Write a clear, simple prompt describing what you want. For example:
“Create a simple hero section. Keep everything minimal—no fancy or unnecessary elements.”
Claude will then ask you to share the Figma file link so it knows where to add the design.
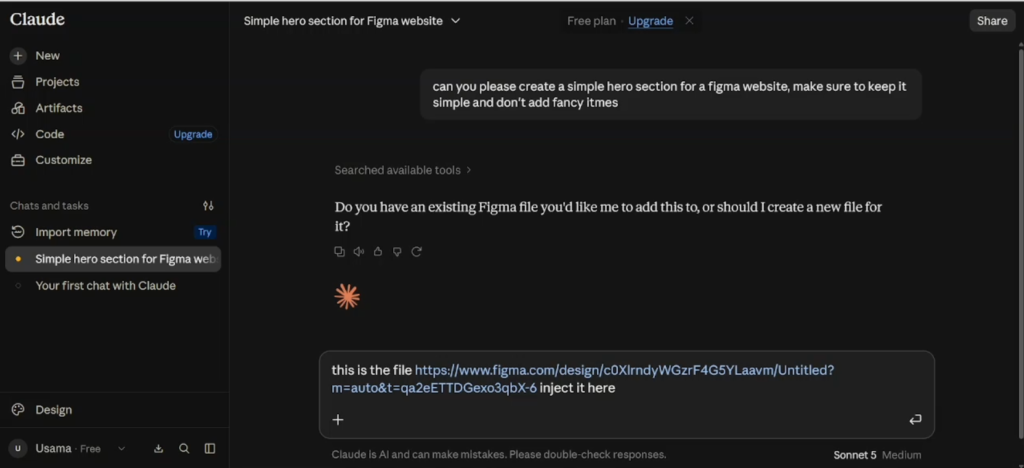
Step 4: Share Your Figma File Link
- Go to your Figma file.
- Right-click and select Copy Link.
- Return to Claude and paste the link, along with a note like: “This is the file—please add the design here.”
Claude will ask for a few final permissions—click Allow Always so you don’t have to repeat this step later.
Also read: How to Connect ChatGPT with Webflow
Step 5: Let Claude Build the Design
Once you approve access, Claude will generate the layout directly inside your Figma file. In this example, Claude added:
- A heading
- A subheading
- A button
It also left blank space for a header and footer, so you can build those out yourself or with a follow-up prompt.
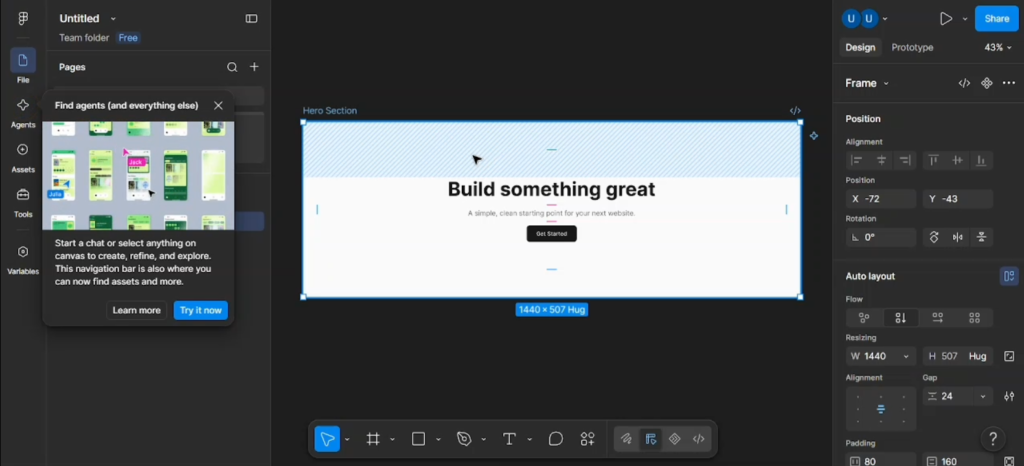
Step 6: Review and Customize in Figma
Open the file link Claude shares (or go directly to Figma) to see the result. From there, you have full control to:
- Edit the text content
- Change colors
- Adjust the button styling
- Add padding or spacing
- Insert a header, footer, or any other elements
Pro Tip
The more detailed your prompt, the better the output. Vague instructions give Claude less to work with, so specify layout, tone, and any must-have elements up front.
FAQs
Do I need a paid Figma or Claude account to use this integration?
No. This works on the free plans for both platforms.
Where do I find the Figma connector in Claude?
Start a new chat, click the plus icon, and go to Connectors (not Plugins) to find and enable Figma.
Can Claude edit an existing Figma file, or only create new ones?
Claude adds design elements to whatever file link you share, so it can work within an existing file rather than only starting from scratch.
Do I need to reconnect Figma every time I start a new chat?
You don’t need to reconnect the account, but you do need to make sure the Figma toggle is switched on in each new chat for it to work.
What kind of elements can Claude add to a Figma file?
Based on your prompt, Claude can add headings, subheadings, buttons, and general layout structure. You can then customize colors, spacing, and content directly in Figma.
Why does Claude leave blank space in the design?
Claude builds around what you ask for. If your prompt doesn’t mention a header or footer, it may leave that space open for you to fill in later.