
Have you ever experienced a keyboard key that suddenly starts malfunctioning, repeatedly types characters, or interrupts your work? A faulty keyboard key can be frustrating, especially when you’re typing documents, browsing the internet, or working on an important project.
Fortunately, you don’t need to replace your entire keyboard just because one key isn’t working properly.
Windows users can easily disable a specific keyboard key using Microsoft PowerToys, a free utility developed by Microsoft. It allows you to disable unwanted keys, customize keyboard shortcuts, and remap keys without making complicated changes to your system.
In this step-by-step guide, you’ll learn how to disable any key on your keyboard in Windows 11 or Windows 10 and how to enable it again whenever needed.
Get 20% discount on your website hosting plan.
What Is Microsoft PowerToys?
Microsoft PowerToys is a free collection of utilities designed to improve productivity and customize the Windows experience.
One of its useful features is Keyboard Manager, which allows users to customize how their keyboard works.
With Keyboard Manager, you can:
- Disable specific keyboard keys.
- Remap one key to another.
- Customize keyboard shortcuts.
- Temporarily turn off unwanted keys.
- Restore your original keyboard settings whenever necessary.
Whether you’re dealing with a malfunctioning key or simply want to customize your keyboard, PowerToys provides a convenient solution.
How to Disable a Keyboard Key in Windows 11 or Windows 10
Follow these simple steps to disable any unwanted keyboard key using Microsoft PowerToys.
Step 1: Download and Install Microsoft PowerToys
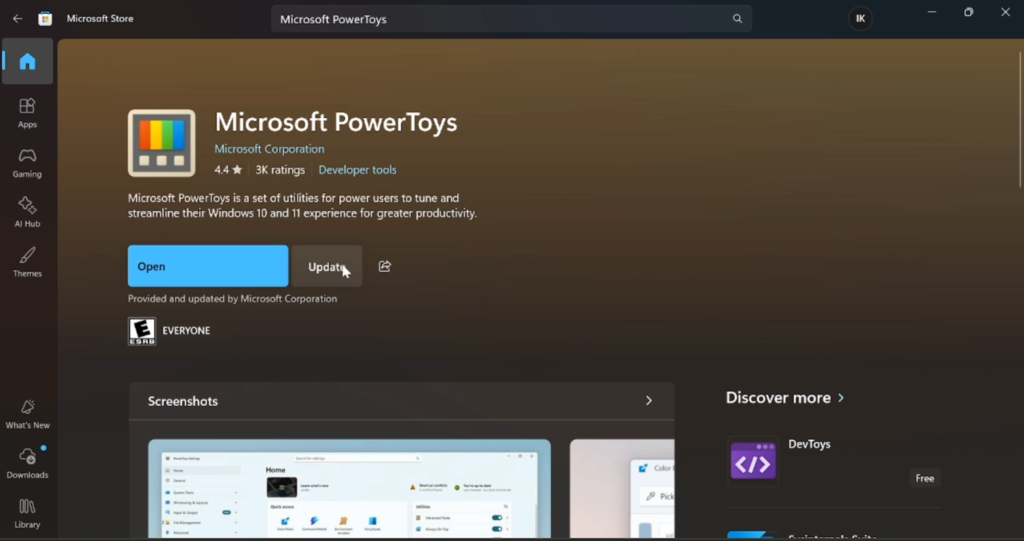
First, you’ll need to install Microsoft PowerToys on your computer.
- Open the Microsoft Store on your Windows PC.
- Click the search bar and type Microsoft PowerToys.
- Select Microsoft PowerToys from the search results.
- Click Install and wait for the installation to complete.
- Once installed, click Open to launch the application.
If PowerToys is already installed on your computer, you may see an Open or Update button instead of Install.
You can also download PowerToys from the official Microsoft PowerToys GitHub repository.
Step 2: Open Keyboard Manager
After launching Microsoft PowerToys, locate the Keyboard Manager utility.
- Open the PowerToys dashboard or its quick-access menu.
- Find and select Keyboard Manager.
- Make sure Keyboard Manager is enabled.
This feature allows you to change how individual keyboard keys and shortcuts behave.
Step 3: Select the Keyboard Key You Want to Disable
Now it’s time to choose the key that’s causing problems.
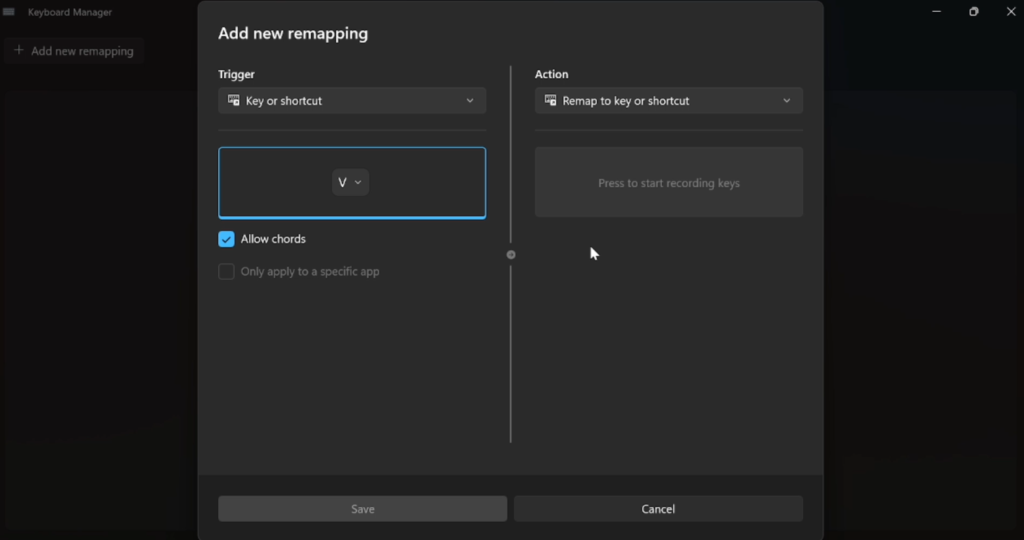
- Open the keyboard remapping interface in Keyboard Manager.
- Click Add new remapping.
- Under the Trigger section, select the option to record a key.
- Press the keyboard key you want to disable.
For example, let’s say the V key on your keyboard is malfunctioning.
Simply press V when recording the trigger, and PowerToys will identify it as the key you want to modify.
You can follow the same process for many other keyboard keys.
Step 4: Disable the Selected Key
After selecting the key, you need to configure what happens when it is pressed.
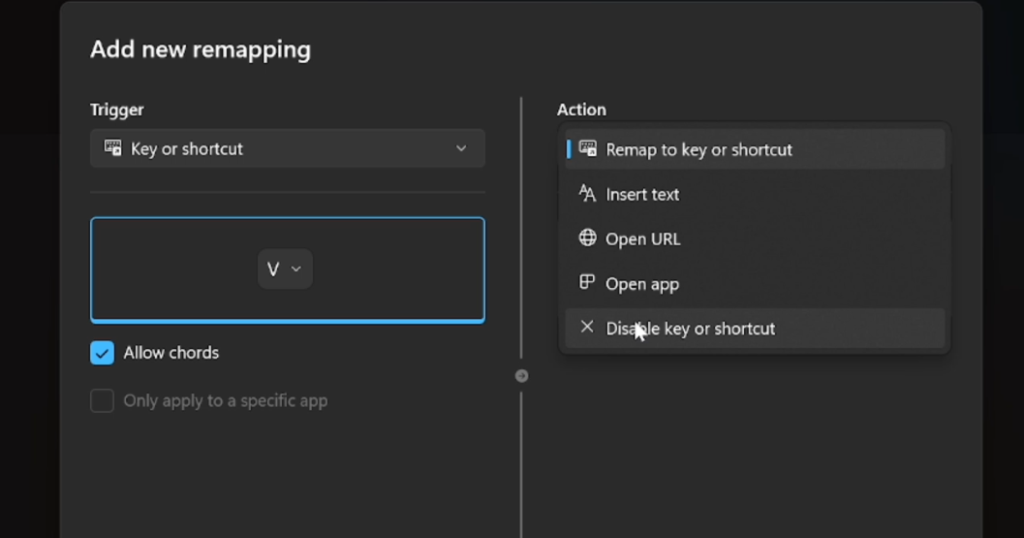
- Go to the Action section.
- Select Disable key or shortcut.
- Click Save to apply your changes.
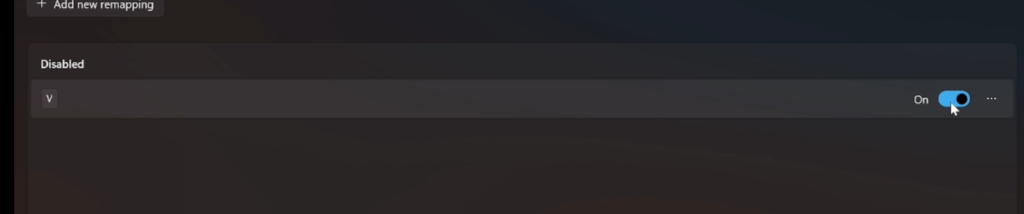
- Make sure the newly created remapping is enabled.
That’s it! Your selected keyboard key should now be disabled.
For example, if you disabled the V key, pressing it will no longer type the letter V while the remapping is active.
Important: PowerToys must continue running for Keyboard Manager remappings to work. Closing PowerToys completely will stop the remapping from taking effect.
Step 5: Test Whether the Keyboard Key Is Disabled
Once you’ve saved your changes, it’s a good idea to test whether the selected key has been successfully disabled.
Here’s how:
- Open Notepad or any text editor.
- Click inside the typing area.
- Press the key you disabled.
- Check whether anything appears on the screen.
If the remapping is working correctly, pressing the disabled key should produce no input.
For example, when the V key is disabled, pressing it in Notepad won’t type the letter V.
This confirms that the key has been successfully disabled using Microsoft PowerToys.
How to Enable a Disabled Keyboard Key Again
What if you want to use the disabled key again?
Don’t worry! Microsoft PowerToys makes it easy to restore the original functionality of your keyboard.
Follow these steps:
- Open Microsoft PowerToys.
- Navigate to Keyboard Manager.
- Find the remapping you previously created.
- Turn off the toggle associated with that remapping, or delete it.
- Return to your text editor and test the key again.
Your keyboard key should now work normally.
For example, if you previously disabled the V key, pressing it will once again type V after you deactivate the remapping.
You can enable or disable your custom remapping whenever necessary.
Why Would You Need to Disable a Keyboard Key?
There are several situations where disabling a keyboard key can be useful.
1. Malfunctioning Keyboard Keys
Sometimes, a keyboard key becomes physically damaged and starts registering unwanted inputs.
Disabling the problematic key can prevent accidental typing while you arrange a permanent repair.
2. Accidental Key Presses
Certain keys, such as Caps Lock, can interrupt your workflow when pressed accidentally.
Disabling these keys can help you avoid unnecessary typing mistakes.
3. Improving Your Gaming Experience
Some gamers accidentally press keys such as the Windows key while playing games, interrupting gameplay.
Disabling an unwanted key can help reduce these interruptions.
4. Customizing Your Keyboard
If you rarely use a particular key, you may prefer to disable it or remap it to another function.
Microsoft PowerToys gives you more control over your keyboard layout.
Things to Know Before Disabling Keyboard Keys
Although Microsoft PowerToys is easy to use, there are a few important things to remember.
- PowerToys must remain running: Keyboard Manager remappings only work while PowerToys is active.
- Changes are reversible: You can disable or remove your remapping whenever needed.
- No physical repair is performed: Disabling a key prevents unwanted input but does not fix hardware damage.
- Some keys have limitations: Certain system-level keys and shortcuts cannot be remapped or disabled through Keyboard Manager.
- Remapping may not work everywhere: Some games, elevated applications, and special input environments may not respect PowerToys remappings.
If your keyboard has a hardware problem, consider having it repaired or replaced for a permanent solution.
Also read: How to Connect Figma with Claude: A Step-by-Step Guide
Conclusion
A malfunctioning keyboard key doesn’t always mean you need to purchase a new keyboard.
With Microsoft PowerToys Keyboard Manager, you can easily disable an unwanted keyboard key in Windows 11 or Windows 10 without complicated software configurations.
Simply install PowerToys, open Keyboard Manager, select the problematic key, and configure it to be disabled.
And if you ever need that key again, you can restore its functionality in just a few clicks.
This simple method can help you avoid unwanted keystrokes, improve productivity, and continue working without unnecessary interruptions.
For more helpful Windows tutorials, software guides, and technology tips, explore BuildNEarn.
Frequently Asked Questions (FAQs)
1. Can I disable a specific key on my keyboard in Windows 11?
Yes. You can disable individual keyboard keys in Windows 11 using Microsoft PowerToys Keyboard Manager. Select the key you want to disable, choose the disable action, and save the remapping.
2. How do I disable a keyboard key in Windows 10?
Install Microsoft PowerToys, open Keyboard Manager, create a new key remapping, and set the selected key’s action to Disabled or Disable key or shortcut, depending on your PowerToys version.
3. Is Microsoft PowerToys free to use?
Yes. Microsoft PowerToys is a free, open-source collection of Windows utilities developed by Microsoft.
4. Can I enable a disabled keyboard key again?
Yes. Open PowerToys Keyboard Manager and deactivate or delete the remapping you created. Your keyboard key should immediately return to its original behavior.
5. Will disabling a keyboard key damage my keyboard?
No. Disabling a key through Microsoft PowerToys only changes how Windows processes that key’s input. It does not physically modify or damage your keyboard.
6. Can I disable the Caps Lock key using PowerToys?
Yes. You can use Keyboard Manager to disable Caps Lock if you frequently press it accidentally.
7. Does PowerToys need to run in the background?
Yes. Microsoft PowerToys must remain running for Keyboard Manager remappings to stay active. If you exit PowerToys completely, the remappings will stop working.
8. Can I disable multiple keyboard keys at the same time?
Yes. You can create separate remappings for multiple keys in Keyboard Manager, allowing you to disable several unwanted keys.
9. Does this method work on laptops and desktop computers?
Yes. Microsoft PowerToys works on supported Windows laptops and desktop computers, so you can use Keyboard Manager with built-in laptop keyboards and external keyboards.
10. Can I disable a malfunctioning key without replacing my keyboard?
Yes. If the malfunctioning key is still sending input that Windows recognizes, PowerToys can often suppress that input. However, this is a software workaround and won’t repair the underlying hardware problem.