If you’ve ever wished you could describe a website design in plain English and have it show up as an actual, editable file in Figma, you’re in luck. ChatGPT now supports a Figma plugin that lets you do exactly that — no paid subscription required on either platform.
In this guide, I’ll walk you through the entire process of linking your ChatGPT account with Figma, generating a design using a simple prompt, and editing that design directly inside Figma. This works perfectly fine on the free versions of both ChatGPT and Figma, so you don’t need to upgrade anything to try it out.
Get 20% discount on your Hostinger hosting plan.
Why Connect ChatGPT with Figma?
If you’re a freelancer, web designer, or content creator, this integration can seriously speed up your workflow. Instead of starting from a blank canvas, you can ask ChatGPT to generate a design concept — a landing page, a SaaS website layout, a mobile app screen, whatever you need — and it will build an editable version straight inside Figma. From there, you can tweak the text, colors, buttons, and layout exactly the way you want.
It’s a great starting point for people who want to speed up their design process, brainstorm layout ideas, or just avoid staring at an empty Figma file wondering where to begin.
Step-by-Step: How to Link ChatGPT and Figma
Step 1: Open the Plugins Section in ChatGPT
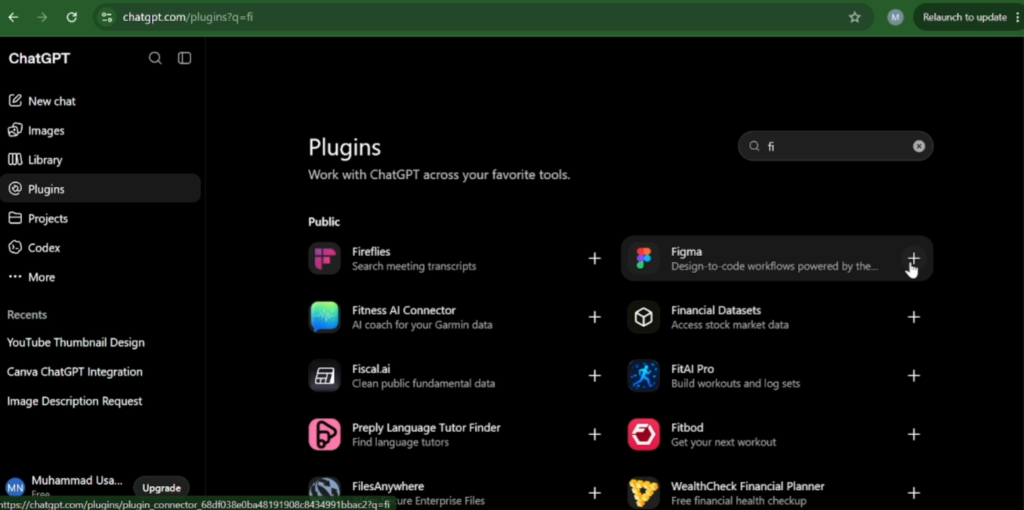
Log into your ChatGPT account and head over to the plugins section. This is where you can browse and connect third-party apps to your ChatGPT workspace.
Step 2: Search for the Figma Plugin
In the plugin search bar, type in “Figma.” It should appear as one of the top results. Once you spot it, click the plus icon next to it to begin the installation.
Step 3: Sign In with Figma
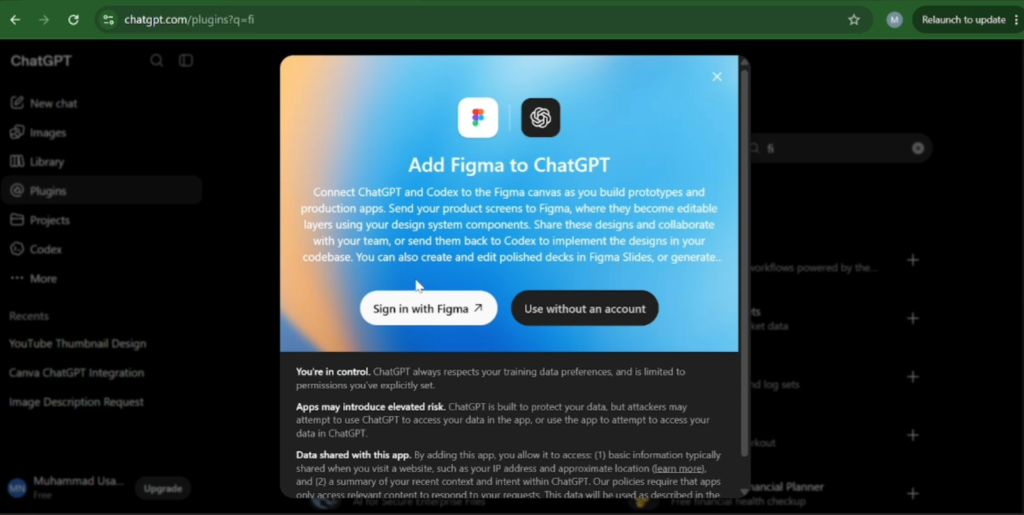
You’ll be prompted to sign in with your Figma account. Go ahead and log in, and you’ll then see a permissions screen. Scroll down, review what access is being requested, and click “Agree and Allow Access.”
Step 4: Wait for the Sync
ChatGPT will refresh and take you back to your main dashboard. Once it reloads, you’ll notice the Figma plugin is now installed and connected to your account.
Step 5: Start a New Chat and Select Figma
Open a new chat in ChatGPT, click the plus icon, and select Figma from the list of connected tools. This tells ChatGPT that you want it to generate a design output through Figma rather than just a text response.
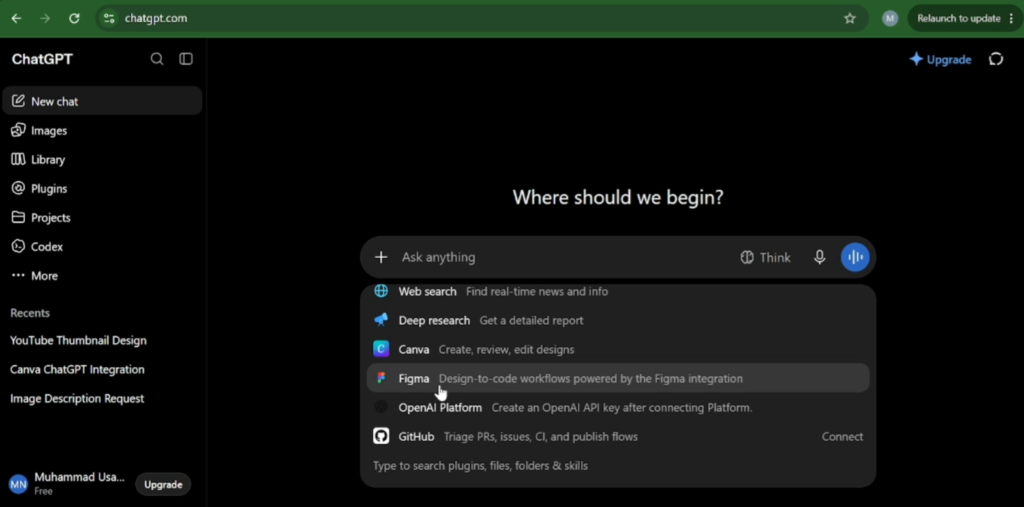
Step 6: Prompt ChatGPT to Create a Design
Now comes the fun part. You can type any prompt you like — ask it to design a website, replicate a layout you already have in mind, or even upload a reference image and ask ChatGPT to recreate something similar. For this walkthrough, I simply asked it to create a website design.
Once you hit enter, ChatGPT will ask for permission to proceed. Click “Allow,” and it will start generating an editable Figma file. This can take a little time, so be patient and let it finish.
Step 7: Open Your Design in Figma
Once the design is ready, ChatGPT will provide a link. Click it, then select “Open Link,” and it’ll take you straight into Figma with your new design already loaded. In my case, it generated a complete SaaS website layout — navbar, hero section, buttons, and all.
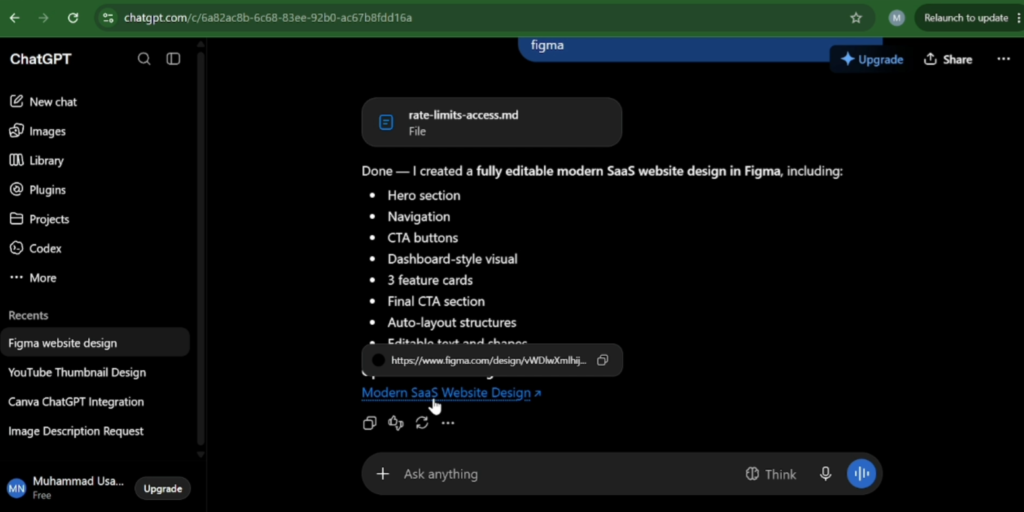
Step 8: Edit the Design Freely
Here’s the best part: everything ChatGPT generates through this plugin is fully editable in Figma, just like any other design file. You can change the text, edit the navigation bar, update button colors, move elements around, delete sections you don’t need, or rebuild parts entirely. It’s your design now — treat it like a starting template rather than a finished product.
Also read: How to Connect ChatGPT with Canva
Final Thoughts
Connecting ChatGPT with Figma is a simple way to speed up your design workflow, especially if you’re someone who struggles with the “blank page” problem when starting a new project. It won’t replace a skilled designer’s eye, but as a starting point for layouts, wireframes, or quick concept mockups, it’s genuinely useful — and it costs nothing to try.
If you’re a freelancer or web developer looking to move faster on client projects, this is one of those small workflow upgrades worth adding to your toolkit.
Frequently Asked Questions (FAQs)
1. Do I need a paid ChatGPT or Figma plan to use this integration?
No. This entire process works on the free versions of both ChatGPT and Figma. No premium subscription is required.
2. Can I ask ChatGPT to recreate a design I already have?
Yes. You can upload or describe an existing design and ask ChatGPT to replicate or create something similar to it using the Figma plugin.
3. Is the design generated by ChatGPT fully editable in Figma?
Yes. Once the file opens in Figma, you can edit text, colors, buttons, layout, and any other element just like you would with any normal Figma design.
4. How long does it take for ChatGPT to generate a Figma design?
It varies depending on the complexity of your prompt, but you should expect to wait a short while as ChatGPT builds the file. Simply allow it the time it needs to finish processing.
5. What kind of designs can I create with this method?
You can generate almost any type of design — website layouts, SaaS product pages, landing pages, app screens, and more — simply by describing what you want in your prompt.
6. Is this a plugin I need to reinstall every time?
No. Once you’ve connected Figma to your ChatGPT account, it stays linked. You just need to select it from the plus icon menu whenever you start a new chat and want to generate a design.