
If your business email lives on Hostinger, when you connect Claude to Hostinger email, you no longer have to copy emails into Claude by hand. Hostinger Mail now has an official connector in Claude’s directory, so Claude can read your inbox, summarize long threads, draft replies in your tone, and even send emails from your own domain — all from inside a normal Claude chat.
In this guide, you will learn how to connect Claude AI to your Hostinger email step by step, how to send your first email through it, and what else you can ask Claude to do with your mailbox. It is based on our video walkthrough, checked against Hostinger’s and Claude’s own documentation, and expanded with the details the video does not cover — including the limits, the safety settings, and what to do if you use Gmail or Outlook instead.
What Claude can do with your Hostinger email
Once the connector is switched on, Claude works with your mailbox like an assistant sitting next to you. You can ask it to:
- Read and summarize your emails. Ask for a summary of your unread messages, or paste nothing at all — Claude searches the mailbox itself.
- Draft professional replies. Tell Claude the tone you want, and it writes a reply you can review before sending.
- Send emails for you. Give Claude the recipient, subject, and message, and it sends the email from your Hostinger address.
- Write cold emails. Give Claude a list of contacts and your offer, and it drafts a personalized email for each one.
- Find things in your inbox. Ask Claude to find the invoice from a client, the latest message in a thread, or every email from one sender.
- Organize your mailbox. Claude can manage labels and folders, so you can ask it to sort or file messages.
You stay in control throughout: Claude asks for your permission before it sends anything, and every email it sends shows up in your Hostinger mailbox’s Sent folder, exactly as if you had sent it yourself.
What you need before you start
A quick checklist before you connect Claude to Hostinger email, so you do not get stuck halfway through:
- A Claude account. Any plan works, including the free plan — the Hostinger Mail connector is not a paid feature.
- A Hostinger Business Email mailbox. The connector works with mailboxes on your own domain hosted by Hostinger. It is included in every Business Email plan (Starter, Standard, and Premium) at no extra cost.
- Your Hostinger login. You will sign in to Hostinger during setup to choose which mailbox Claude can use, so keep your Hostinger account password or passkey ready.
- A mailbox you are comfortable sharing. Claude will be able to read the mailbox you connect, so if you use one address for everything, consider creating a separate mailbox for Claude — Hostinger itself recommends this.
If you do not have Hostinger email yet, our Best Hosting guide compares the plans we recommend. Disclosure: that link is an affiliate link — if you sign up through it, we may earn a commission at no extra cost to you.
How to connect Claude to Hostinger email, step by step
Step 1: Open Claude and find the Connectors directory
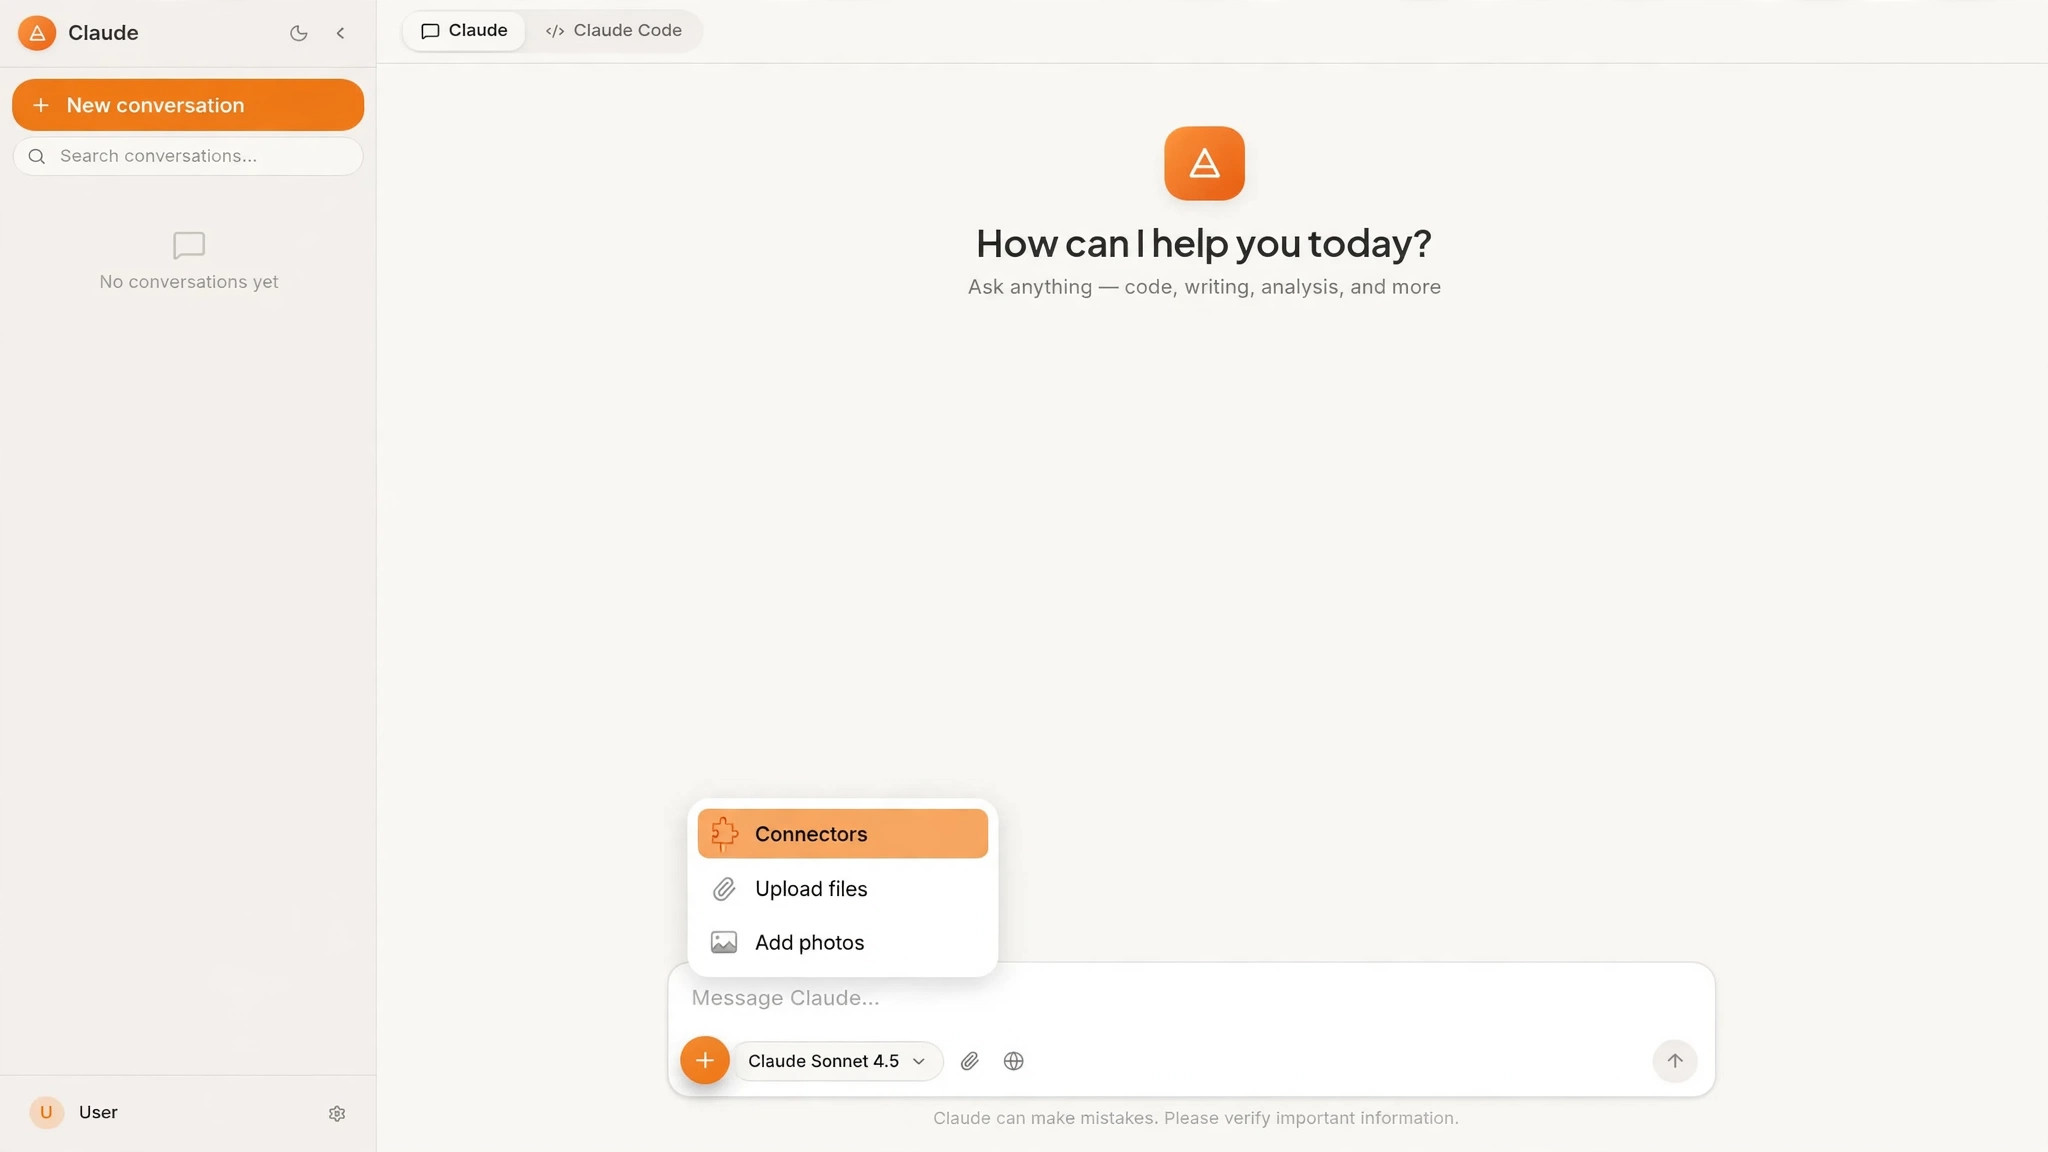
Log in to Claude at claude.ai and start a new chat. Click the + button at the bottom-left of the message box, then click Connectors. From there, choose Add connectors and then Browse connectors to open the directory.
If you prefer to go through settings instead, the same directory is available under Settings > Connectors (listed under Customize), then Discover. Either route takes you to the same list of connectors — use whichever one your screen shows.
Step 2: Find the Hostinger Mail connector and connect it
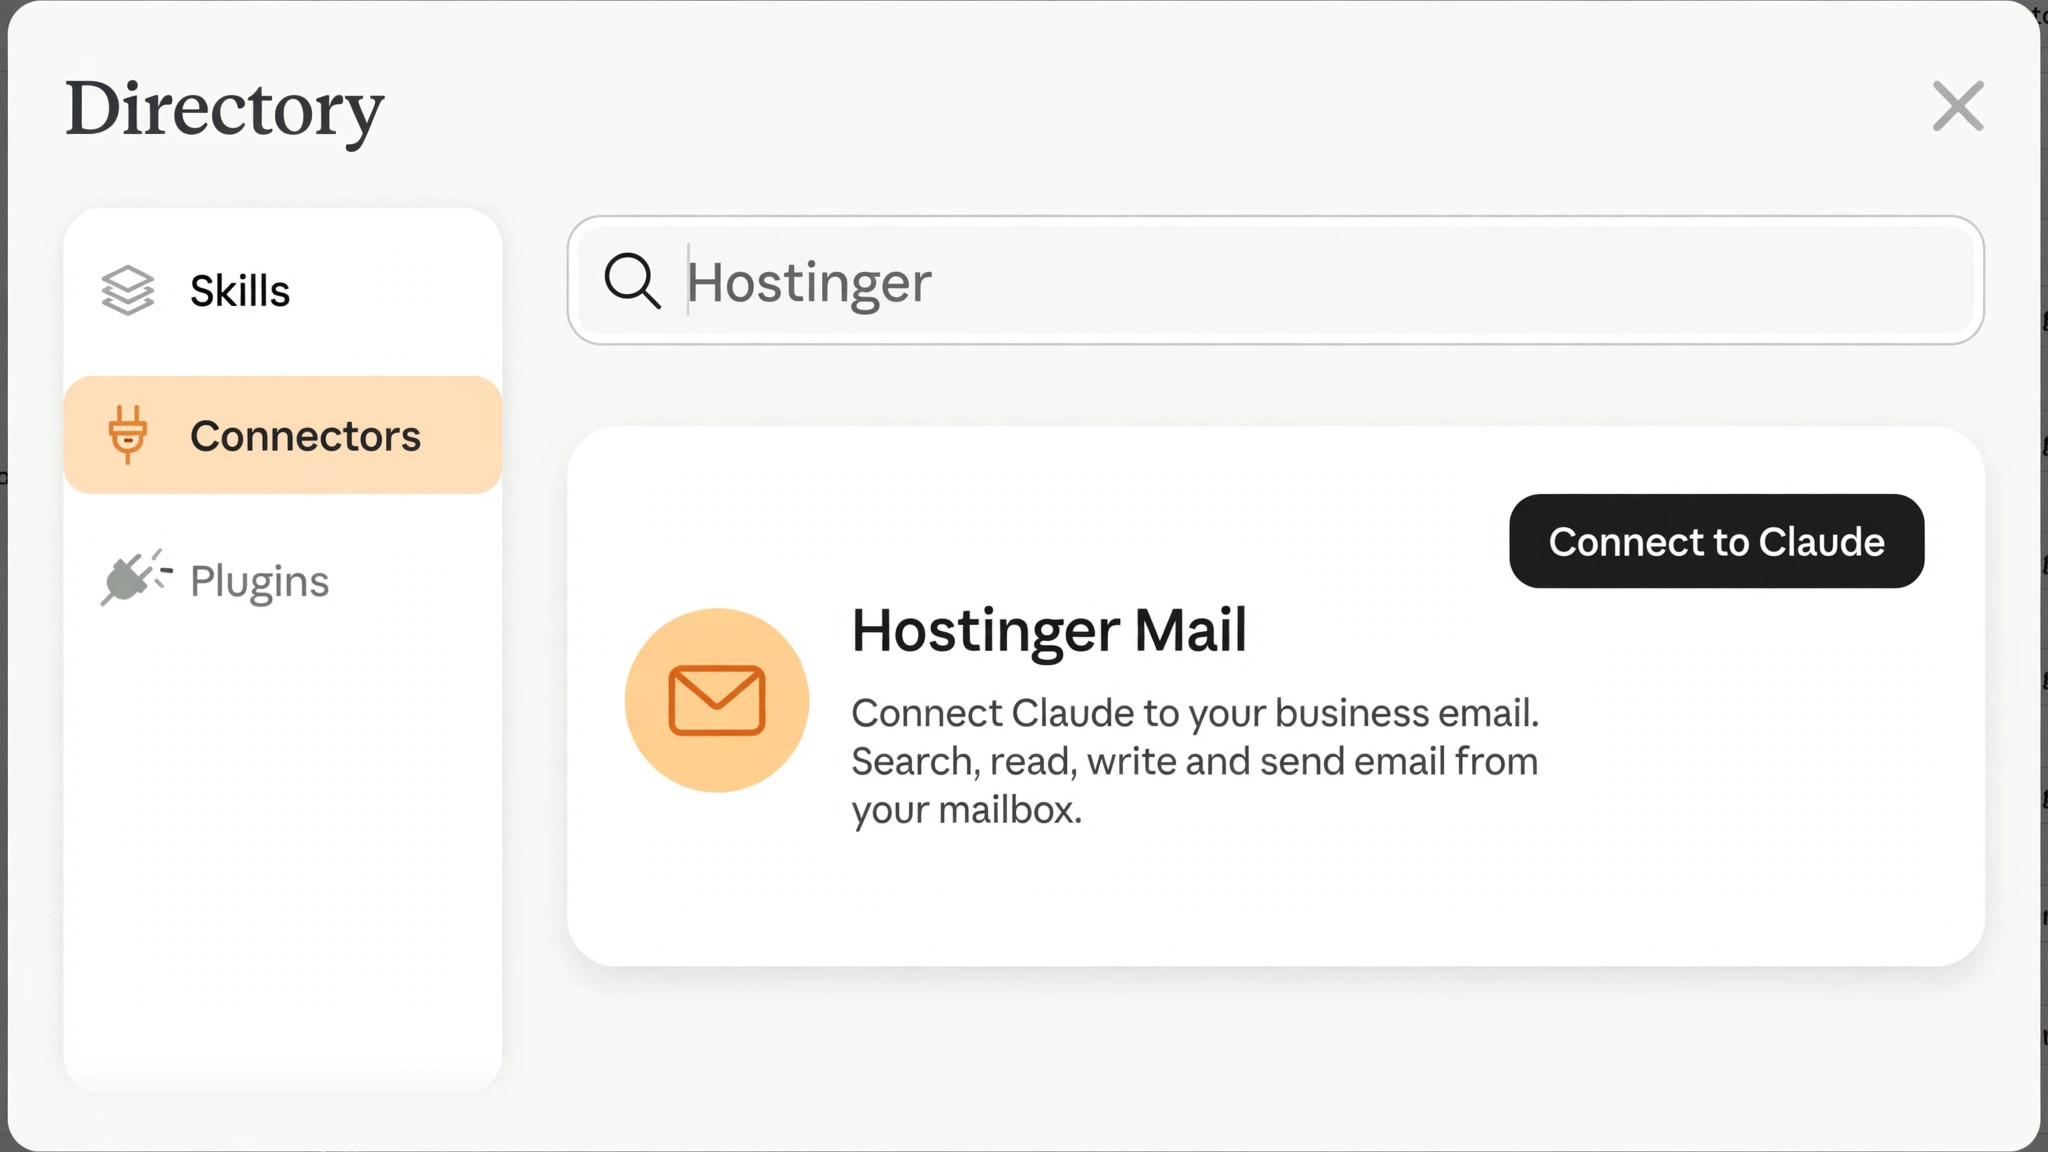
In the connectors directory, type Hostinger in the search box. Click the Hostinger Mail connector in the results, then click Connect to Claude next to it.
The connector page describes what it can do — search, read, write, and send email from your mailbox — so you can check the permissions before you commit to anything.
Step 3: Sign in to Hostinger and allow access
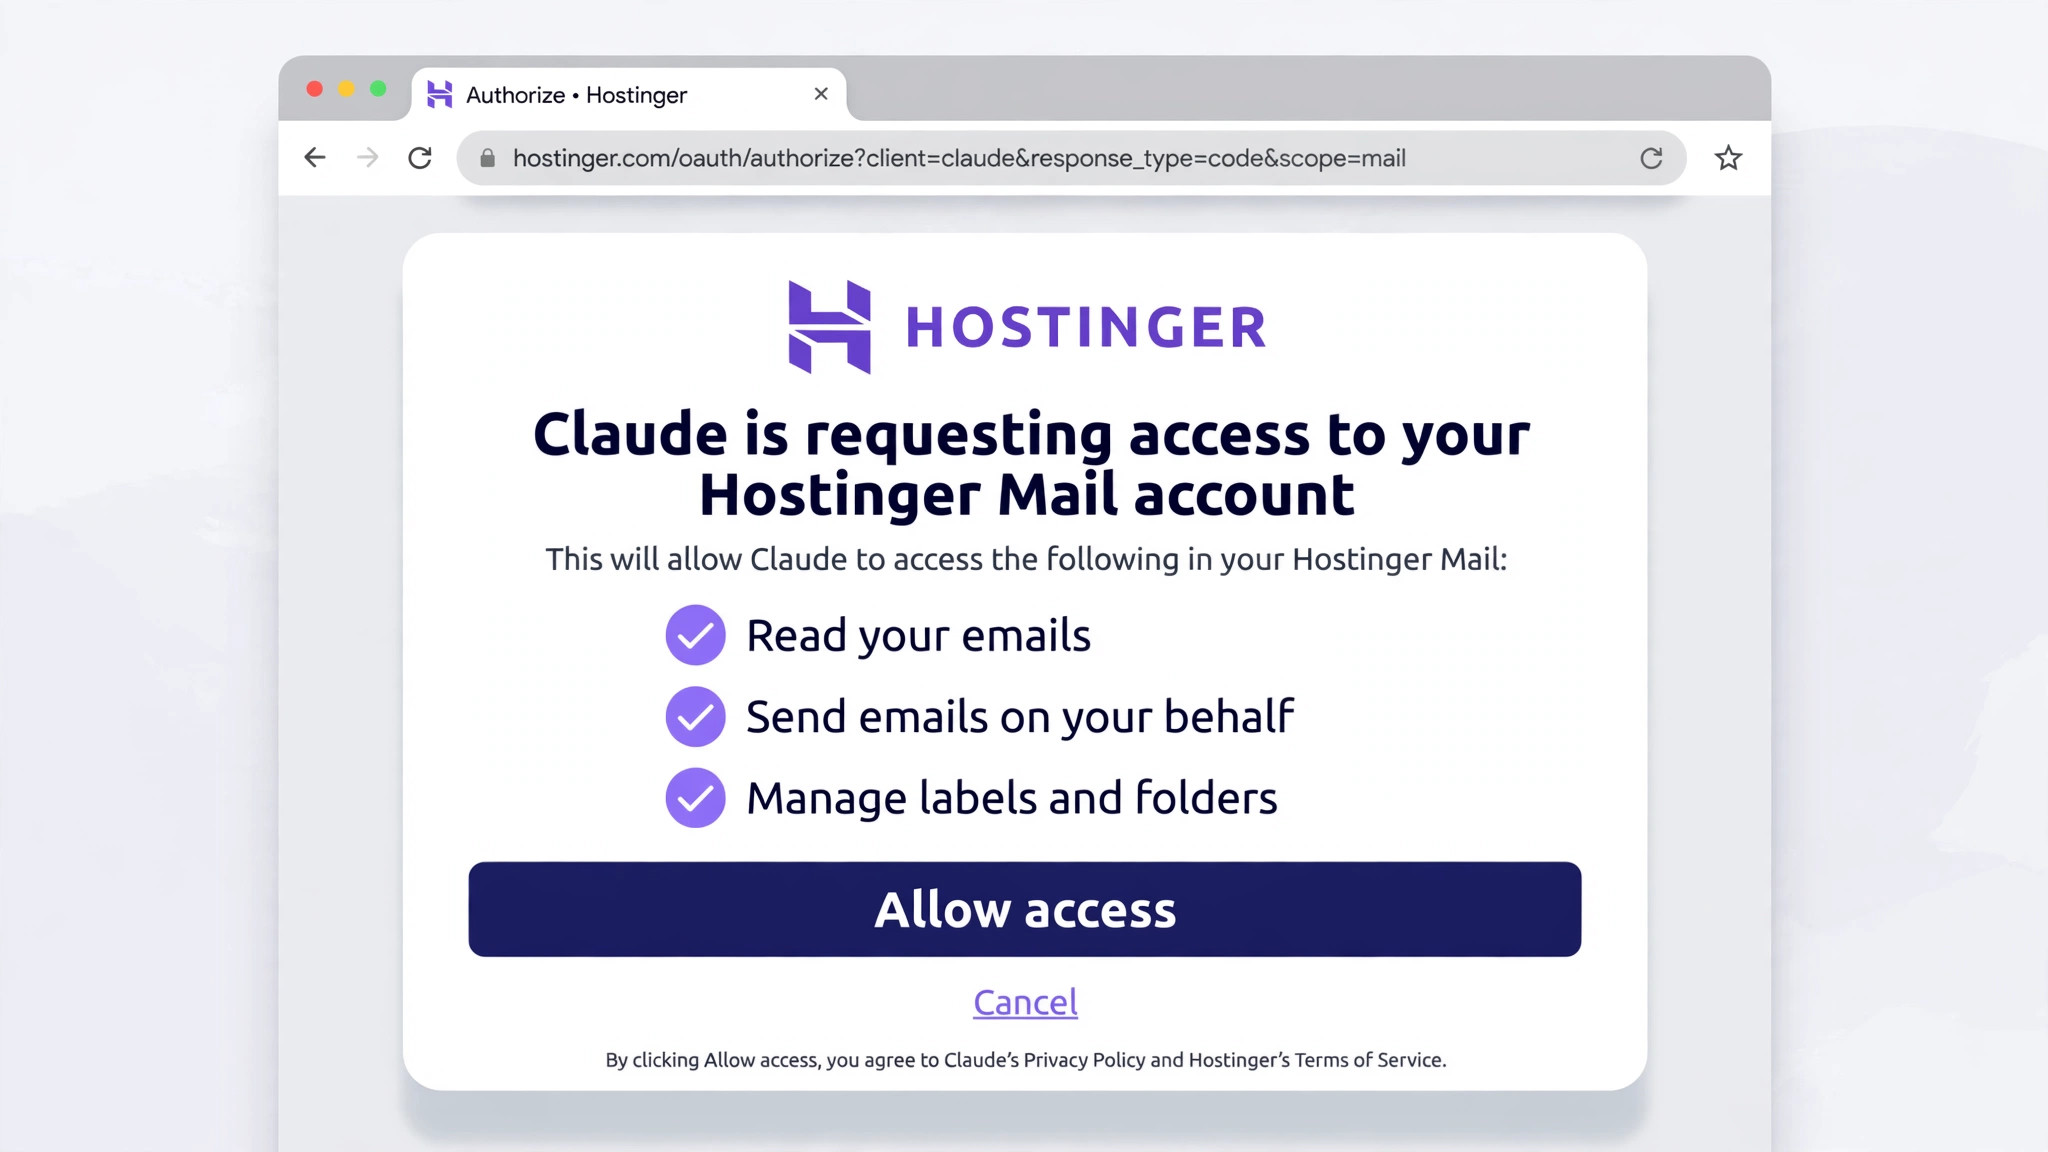
Claude will now take you to Hostinger to authorize the connection. Sign in to your Hostinger account and choose which mailbox Claude can use. Then review the permissions Claude is asking for:
- Read your emails
- Send emails on your behalf
- Manage labels and folders
Scroll down and click Allow access. After a moment, Claude will show the connector as connected — you should see Connected to Hostinger Mail in your connectors list. That is the whole setup; there is nothing to install and no code to write.
Step 4: Turn the connector on in your chat
Connecting the connector is not quite the same as using it — you also need to switch it on for the chat you are in. Open a new chat, click the + button, go to Connectors, and make sure the Hostinger Mail toggle is enabled. The toggle is per chat, so check it each time you start a conversation where you want Claude to use your email.
If the toggle is off, Claude simply will not see your mailbox in that chat, even though the connector is connected to your account.
Step 5: Ask Claude to send an email
Now try it. In the same chat, ask Claude to send an email — for example: “Use my Hostinger Mail to send a professional greeting email to client@example.com.”
The first time Claude uses the connector, it will ask for your permission before it acts. Click Allow always if you want Claude to send emails without asking every time, or Allow once if you would rather approve each email individually. Claude will then send the email and show you the subject and message it used, so you can check exactly what went out.
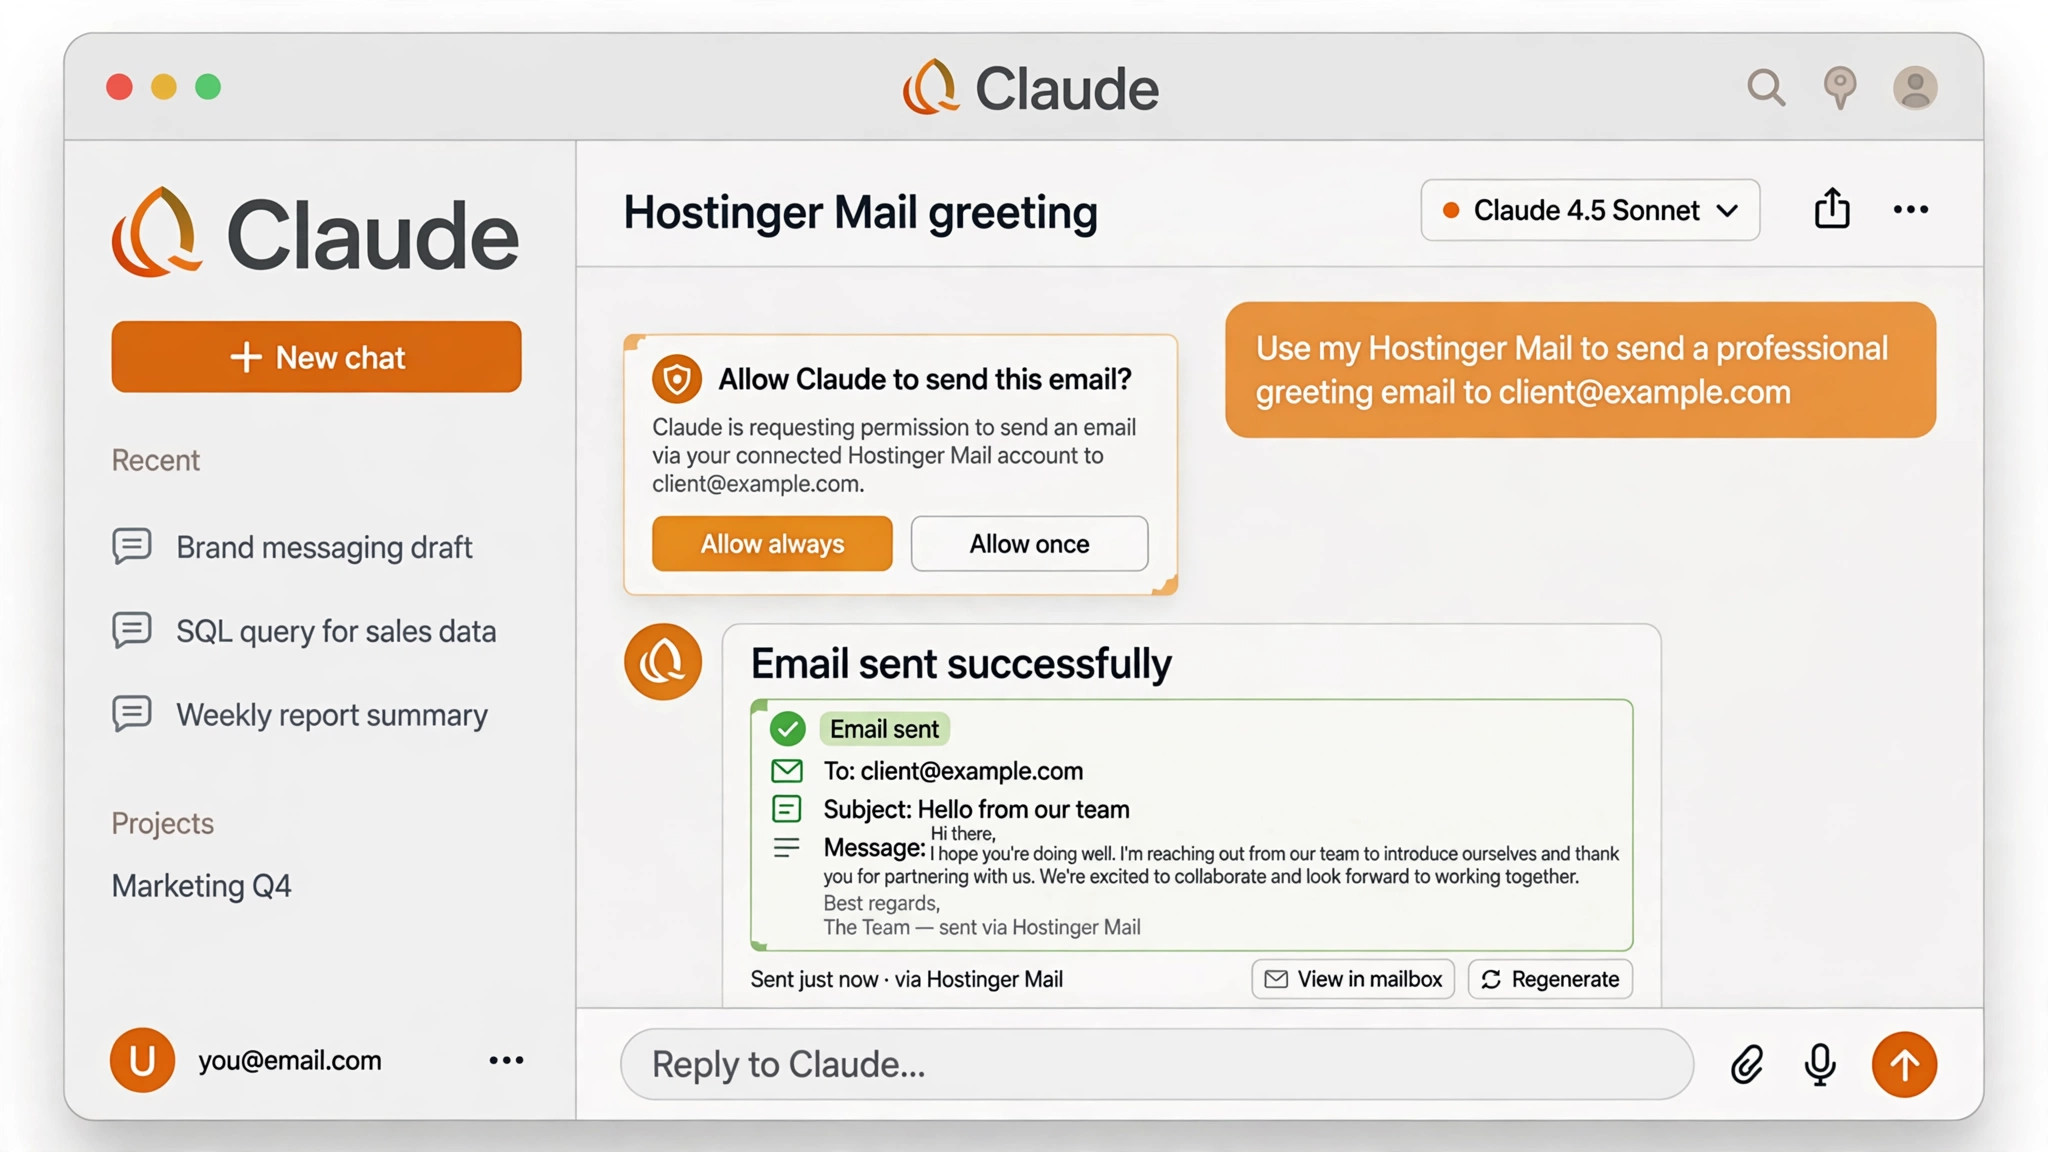
To confirm the email really went out, log in to Hostinger webmail at mail.hostinger.com and open the Sent folder. You should see the message there, sent from your own address — and the recipient should have received it too. In the video, we checked both: the sent copy in Hostinger webmail, and the delivered email in the recipient’s inbox.
Hostinger’s own tutorial on sending email with Claude walks through the same send flow.
What else you can do once you connect Claude to Hostinger email
Sending one email is only the start. Once the connector is on, try prompts like these:
- “Summarize my unread emails.” Claude reads the inbox and gives you the important points, so you can triage a busy morning in a minute.
- “Draft a reply to Ana confirming Friday’s meeting.” Claude finds Ana’s email, reads the thread for context, and writes a reply in your tone. Review it, tweak it if needed, then ask Claude to send it.
- “Find the invoice from last month.” Claude searches your mailbox instead of you scrolling through it.
- “Write a cold email for each person on this list.” Paste your list of contacts and describe your offer, and Claude drafts a personalized email for each one. Send them one at a time after reviewing — never blast a whole list without reading what Claude wrote.
- “Organize my inbox by client.” Claude can use labels and folders to sort messages, which is handy if your inbox has grown out of control.
If you use Gmail instead of Hostinger, the same idea works with Claude’s Gmail connector — see our guide on connecting Claude AI to Gmail and sending emails for free.
Things to know before you give Claude your inbox
- The connector only works while you are chatting. Claude can use your mailbox during an active conversation. It does not watch your inbox in the background or act on new emails by itself. For background tasks, Hostinger points to its Agentic Mail webhooks, REST API, or MCP server instead.
- You do not need a paid Claude plan to connect Claude to Hostinger email. The Hostinger Mail connector works on every Claude plan, including Free.
- Use a separate mailbox for Claude if you can. Hostinger recommends connecting a dedicated mailbox rather than your main one, and setting allow and block lists so Claude only works with the senders you approve.
- Always review before Claude sends. Claude drafts good emails, but it can get a detail wrong — a name, a date, a price. Read the subject and body Claude shows you before you approve a send, especially for client emails.
- Cold email still has rules. Claude will help you write outreach emails, but sending bulk unsolicited email can get your domain flagged or your mailbox suspended. Only email people who are likely to want to hear from you, keep lists small, and honor opt-outs.
- You can disconnect anytime. Go to Settings > Connectors in Claude, open Hostinger Mail, and disconnect it. Claude loses access immediately, and your mailbox is untouched.
- Gmail and Outlook are a different route. This connector only works with Hostinger mailboxes. If your mail lives in Gmail or Outlook, you can either use Claude’s Gmail connector or migrate your mail to Hostinger with its email migration tool — the Hostinger Mail connector itself will not reach a Gmail inbox.
FAQs
Is connecting Claude to Hostinger email free?
Yes. The Hostinger Mail connector works on every Claude plan, including Free, and it is included in every Hostinger Business Email plan (Starter, Standard, and Premium) with no separate subscription. You only pay for the email plan itself, if you do not already have one.
Can Claude read all my emails?
Claude can read the mailbox you connect, and only that mailbox. It reads messages when you ask it to — to summarize, search, or draft a reply. It does not monitor your inbox in the background. If that still feels like too much access, connect a separate mailbox for Claude and keep your main inbox private.
Can Claude send emails from my domain?
Yes. Once the connector is switched on, Claude can send emails from the mailbox you connected, using your own domain address. The recipient sees your normal address, not a Claude address, and the sent message appears in your Hostinger Sent folder.
Do I need Claude Pro or a paid plan?
No. The connector is available on the free plan. Paid plans give you higher usage limits in Claude generally, but the Hostinger Mail connector itself has no plan requirement.
How do I disconnect Claude from my Hostinger email?
In Claude, go to Settings > Connectors, open Hostinger Mail, and choose Disconnect. You can reconnect later the same way you connected it the first time.
Why does Claude ask for permission before sending?
Claude asks the first time it uses a connector’s tools, and you can choose Allow once or Allow always. It is a safety check so that no email goes out without you knowing. If you picked Allow once, Claude will ask again next time.
Can I use this with Gmail or Outlook?
Not through this connector — Hostinger Mail only reaches Hostinger mailboxes. For Gmail, use Claude’s Gmail connector instead; our Claude to Gmail guide walks through that. For Outlook, Claude has a Microsoft 365 connector, though sending may need your administrator to enable write tools.
Does the connector work on mobile?
Yes, as long as you are chatting in the Claude app with the connector switched on for that conversation. The setup is easiest on desktop, where the connectors directory is simpler to browse, but once connected, the same chat works on your phone.
Conclusion
To connect Claude to Hostinger email takes about two minutes: find the Hostinger Mail connector in Claude’s directory, sign in to Hostinger, allow access, and switch the connector on in your chat. From there, Claude can read, summarize, draft, and send emails from your own domain — and it asks your permission before anything goes out.
The practical win is not the sending itself; it is the triage. Asking Claude to summarize your unread emails or draft replies to a thread it has already read saves the back-and-forth that eats most of an inbox hour. Just keep the guardrails in place: use a separate mailbox if you can, review every email before it sends, and disconnect the connector if you ever stop using it.
If you build websites with AI too, our guide on connecting Claude to Webflow shows how Claude can build a site for you in minutes. And if your mail lives in Gmail instead, see our guide on connecting Gemini to Gmail.
Watch the video
Watch the full walkthrough above to see the connection done live — finding the Hostinger Mail connector, allowing access, and sending the first email through Claude.